Lunes, Oktubre 3, 2011

MOTD: clubbing make-up!

Hey lovelies!

So last Friday me and my friends went out to party! But that was only because we attended a friends birthday! Since i got here in Manila, Philippines, it's only been like 4 times the most that i've gone to clubs, power-dress up and put on a very sexy- eye-catching make-up! So this party was another chance for me to relive my, not so far gone, TEENage life! So here's a picture of my make-up that night!
Do you lovelies like it!? I loved it! It's more on the shimmer that's why i added cosmetic glitter on the middle area and went really matte and dark on the sides. I also used a nude lip and bronzer for the cheeks because i want the attention to be all in the eyes. That was my goal of the night and i was quite successful! 
I also did my girl friend's make-up and they were stunning!
 This is Pauline
This is Lika!

Sooooooo...

If you girls have questions regarding this look, i would be happy to answer them!
I'll show you more photos below! 
Enjoy!
 

By the way i wore this fitted blue and white striped dress.. it was very fitted but i love it! i forgot where i purchased it, i think it was in a bazaar at World Trade Center, but I was sure it was less than Php500. Lika and i bought out shoes the same day @ SM Department Store Makati for Php1,200, it's Parisian by the way. 
.
.
.
My Friday was a blast!
How was yours!?


Cheers! <3

Biyernes, Setyembre 2, 2011

Tutorial: Bohemian/Arabic nails!

Hey Lovelies!!

So if you guys seen the Sex and the City 2 movie, and your a nail addict, then you wouldn't miss out the part when the girls were on the poolside and Samantha pulled out her phone and BOOOMM! THE NAILS!! Honestly i did fell in love with her nails!! So i went on the internet to look for pictures and saw a tutorial by a youtube star - JULIE- who is also one of my favorites. She did a tutorial on this and i want to make one too with a little add-ons and changes. So enough with this mumbling and let's get started!!

First the things you'll need/ i used:

Nail art tools bought this from Landmark (comment if you have questions!)

Dotting tool & Thin brushed tool

a solid blue matte color, green shimmery color, mustard gold color

Rhinestones

 AND LET'S START!

 * Start of with a base color so you have a thin layer that separated your nail from possible harmful chemicals of a nail polish and so that your nail color wont chip fast. :)

*Then apply your blue color. You don't have to be neat yet because you can remove excess polish later on.
 
*Then make a cross on your nails using the green color.

*Then it's time to apply your rhinestones. The trick is that you know how to play with your stones. You can apply it in different ways like this.
slightly wet the tip of toothpick and the rhinestone will stick to it. use it to pick up the stone and decorate! 


draw on spirals/ C shapes like this
*To create something like this. Always start from the stones, going out, create your spiral/ C shape using the gold tone.


*Then take a few of your circle rhinestones and apply at least two all over the nails and using a dotting tool put dots around especially on spaces.
     
Add caption
*Then wait for about 20 minutes before applying top coat, apply a generous amount especially on top of the rhinestones to avoid fall outs. Don't forget to clean the sides by using a cotton bud with acetone.

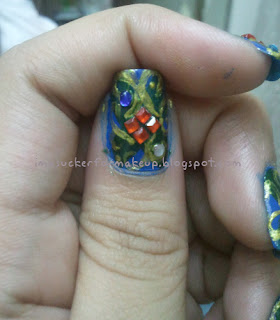
*And here's the finish product!!


Hope you guys liked it! Don't forget to leave a comment of what you think!
.
.
.
.
Cheers! <3

Miyerkules, Agosto 24, 2011

NYX Round Lipstick: Review

Hey Lovelies!

So i promised this review for another NYX product and it's their Round Lipstick. I currently have 5 of these little darlings and again.. i plan on expanding the family. Let me start by showing you photographs and read on for the whole review! <3

The packaging:
Power, Blush, Hermes, Paris, Hot Pink(forgot to include in picture)
 So the packaging comes in the traditional packaging of lipsticks. As you girls can see in the photo, it's all black and you will see it's shade on the bottom and the name on the top part. The packaging's very simple and cute and their easy to store too!

Here are swatches:

taken from my phone

Taken from DSLR
Here are pictures when on my lips:


What's YEY for this lipstick:

I really have to say that i adore the scent of this lipstick, it's very sweet and you can smell it from your lips. It also applies generously with only one run through. It has this glossy finish but not too much, just right. somehow it still has that matte finish but a little shiny which i love because i don't want too glossy lipsticks. This has A LOT of shades that you guys can choose from this is just 5 of it, the main thing i love about it. It's colors/shades are very fun and i swear you girls will love this baby girl here. The price is very economical for Php200 or even less.

What's BOO for this lipstick:

Well it doesn't stay on for a very long time. Make sure you girls check the inside before you purchase your lipstick because sometime there can be factory defects. My experience was the stick inside was a little loose, making it move, so i had to store it inside the fridge and put it back after. But, i only experienced this with one tube so i think you girls should check your tubes to avoid this one.

THING IS:

personally i really don't have any other problems with the product and i love the colors and its prices! So i would definitely buy another tube.

That's all for this review! if you have questions, leave a comment down below! Hope this review helped you guys decide! I KNOW SELLERS OF THIS PRODUCT! tell if you want to buy one! <3


CHEERS! <3

Martes, Agosto 23, 2011

NYX Soft Matte Lip Cream Review

Hey Lovelies!


So lately i've been crazy about lipsticks and my whole look of the day just doesn't seem to be complete without it. It was just within this year when i learned to use lipstick on a daily basis and like i've said in my other blogs, lipstick adds more color to our face especially when you don't want to use heavy eye shadows.

This kind of lipstick i'm currently crazy about, i have to share to you guys. Ever heard of NYX's Soft Matte Lip cream? If you haven't here's a review! <3

The packaging:
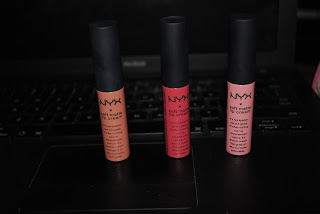
Stockholm, San Paulo, Istandbul

These little darlings come in cute little tubes and applies with a lip brush type like that of a lip gloss. NYX has around 11 different shades and i currently have 3 as of now and will surely add more different shades. check their website here.

"It's not lipstick neither lip gloss, it's a matte lip cream." - this was how NYX would call their baby right here.

here are pictures:


They're all my favorites but my favorite as of now is STOCKHOLM.

What's YEY! for this product?
Well personally i really love the matte effect of the lip cream. It smells like chocolate and it has very beautiful colors. It's very easy to apply and it's very long staying because your lips absorbs it and it does dry fast. Even after eating, the color is still there. AND it doesn't make your lips go dark/black. It's also easy to store because its pocket sized.

What's BOO! for this product?
Well it's not really that friendly to those who have dry lips because there's a possibility that it can dry your lips more and end up having chapped lips. I for one have dry lips but i've discovered a remedy for this. I simply apply petroleum jelly or chapstick before applying the lip cream. It's a little pricey for Php350 from my experience but you guys can also buy this one for as low as 220 if you guys are lucky enough to find one. If you have questions or inquiries don't hesitate to post a comment about it below.

Given the YEYs and BOOs above it's now up to you to judge. If you'll ask me, i'd definitely purchase another one. The matte effect of the product is really amazing and is really not a lipstick neither a lip gloss, it's a lip cream!  I hope this review has helped you lovelies out there who are hesitant to buy this products. again, if you have questions or inquiries post it down below!

watch out for the NYX round lipstick review! :)


CHEERS! <3

Lunes, Agosto 15, 2011

Make-up Tutorial: Ice Cone eyes!

Hey Lovelies!

I think i haven't told you guys yet who my favorite beauty guru ever is. I know a lot of you will agree with me if you girls know her. She's a beauty guru who has made herself well know all over the world today. She is a youtube star because her videos are watched by millions and she's admired by tons of girls out there, including me. She's none other than Michelle Phan. My passion for doing make-up, i got it all from her, she's my beauty goddess! You can check her out at Youtube, just type "Michelle Phan" or go to her website: www.michellephan.com.


I have watched all her videos from her first to her latest and i just love every single one of them. The tutorial that i will be doing today is a remake of Michelle's "Rainbow eyes" tutorial. In her tutorial she used a make-up forever's 12 flash color case, so i've been wanting to do this look since forever and since here in the Philippines there's no much make-up to buy and choose on, I IMPROVISED! This look is so easy, you can do it outdoors! read on and watch how i did it, NikkiAlves style! :)

Here's are the materials or products i used:

 (click on the image for larger view)
This is a face paint and this will serve as our main "ingredient" in the tutorial in replacement of the 12 flash case. Bought this @national for only Php 23.

Nichido Turquoise eyeliner
Yellow matte eye shadow
blue matte eye shadow

pink/blush matte shadow


 *i also used a black liner for tightlining
*pink blush
*NYX round lipstick in Paris


The Steps:

use the white colored face paint and apply all over your lid.

using your fingers, with a light hand, distribute the color evenly.

Then select the yellow color face paint and out this on the center of your lids.

using the blue face paint, mix it with white to create a baby blue color,

then apply it on the inner lids and blend.

mix red and white= pink then apply it on the outer lid to the crease area.

using the matte yellow eye shadow put it on top of the yellow so you can prevent creasing.

The blue eyeshadow on the blue color and pink on the pink eye shadow.

using a turquoise color apply it as liner on your lower lash line.

put on your pink blush. For the lips, you can use any natural pinkish/red color. What i did was apply my lipstick and blot off the excess on a piece of tissue to achieve that stained lip effect. 

*The face paint i used is safe on skin because it is made mainly for children skin.

HERE'S THE OVER ALL LOOK!


That's it for another tutorial! Hope you guys liked the alternative i used!
You should try this! its very fun and easy! 

Make my day by leaving a comment, subscribe and follow on bloglovin'!


CHEERS! <3